Adding
a User Account
Through Your Control Panel
Q.
How would I add a user account?
A.
Follow
these step by step instructions.
- Login
to your Control Panel
- Click
on Add User

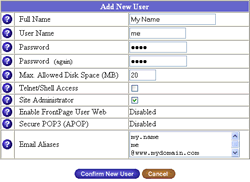
- Fill
in the Form that shows up. Information for each
field is below the screenshot.

| Field |
Description |
| Full
Name: |
Put
Your Name. This will show up in the Site User
List. You can put Capital and Lowercase Letters,
Spaces, Underscores (_), hyphens (-), and Numbers
|
| User
Name |
This
is your username. It will start as the first letter
of your first name followed by your last name.
You can include numbers, lowercase letters, periods
(.), hyphens (-), and underscores (_). It must
be 12 characters or less
|
| Password: |
Your
password needs to be at least 3 characters long.
A good password is one that does not come from
a dictionary, is at least 8 characters long and
has at least one non-alphabetic character.
|
| Max
Allowed Disk Space |
This
is the quota for that username. It is measured
in megabytes. This includes all web pages, emails,
and other files for that user.
|
| Telnet/Shell
Access |
This
will allow that username to login through SSH.
You should only allow people you trust SSH access
as they could destroy your website with a few
keystrokes. SSH is needed to run command line
programs. Some CGI scripts require command line
programs to be run such as creating an index
for a search engine. You can also copy files
to other folders, rename files, and do a lot
more through SSH.
|
| Site
Administrator |
This
will allow that user to login to http://<mydomain.com>/siteadmin/.
Only allow people you trust to become site administrators.
They can remove user accounts as well as add and
remove files for the root website of www.mydomain.com.
|
| Enable
FrontPage User Web |
If
enabled, this will allow that user to connect
to http://<mydomain.com>/~<username>/
and modify their personal site. To modify www.mydomain.com
itself, you need to use the username webmaster
and the original password from your e-mail.
|
| Secure
POP3 (APOP) |
If
enabled, this will allow that user to use Secure
POP3. Please note that only a few e-mail client
support it currently.
|
| Email
Aliases |
These
are e-mail aliases for that user. They will
login with their username instead of their aliaes.
This is useful if you want multiple e-mail addresses
to go to one e-mail inbox. Put each alias on
a line by itself as depicted in the screen shot.
Example:
Username:
jsmith
Aliases: sales, info, orders, john.smith
All e-mail going to sales@<mydomain.com>
will go to jsmith's inbox.
Catchall
Accounts
To
enable catchall, all you need to put is "@www.<mydomain.com>"
on a line by itself as depicted in the screenshot
above.
|